Showing posts with label 18th century. Show all posts

Monday, February 25, 2013

Historical Sew Fortnightly #3: Under It All

I've been seeing a flurry of HSF #4 posts, which reminds me that this is the last day I can post about my HSF #3 entry. You do all realize that while the challenge needs to be done by the deadline, the post doesn't need to be written for up to another fortnight?  It's a good thing for people like me who are working up to the literal last minute and don't have time to make a post as well!

Under It All: Eighteenth Century Pockets

In establishing my ambitious sewing plan for 2013, I realized that for several years I have been neglecting some important non-essentials.  Essentials are, obviously, gowns and the "hard" underpinnings necessary to give me and the gowns their proper shape. Stays and hoops; and for me, usually shoes.  Accessories are non-essentials that add to the look of the outfit, and may or may not serve a functional purpose.  Important non-essentials, though, is a tricky in-between category that includes loads of things not strictly necessary, but it's awkward to get along without them. They can be either unseen or outside, too.

One of my important non-essential needs is a way to Carry All The Things.  At Costume College last year I found myself using the same little tapestry reticule with half of my outfits, including Roman and Maid Marian. I simply didn't think it through, and that was my only option.  For my pink wool 1780s I at least had a pocket, but that was very small.  It even developed a hole!

So like HSF #2 for me, HSF #3 was another easy, but important, challenge. Not only did I replace my little holey pocket, but I made two big ones!

DSC06228 cropped

I didn't want any more trouble with too-small pockets, so these are on the larger side of extant examples. I cut them at 18" long, if I recall correctly.

Everything came from my stash, too. The front fabric is printed cotton left over from my first 18th century dress.  It's not strictly accurate, if for nothing more than subtle opalescent accents.  It's very pretty, though, and I have a yard of it left. The rest of the fabric - front facings and backs - is more pale green linen. I have a petticoat and stays made from it, with still more left.


The binding is navy cotton twill tape, and the ties are gray ditto. Like the pale blue tape I used on my other 18th cent. underpinnings, these also are from Costume College.

DSC06230

Since my materials aren't completely accurate, I didn't take time away from HSF #4 to hand sew these pockets.  I did all I could on the machine, including sewing on one side of the binding. Everything visible is by hand, however.


The Challenge:  HSF #3, Under It All

Fabric:  Indienne cotton print in blue and green with opalescence, on white. Green medium-weight linen. Navy cotton twill tape, 1" wide. Gray cotton twill tape, 1/2" wide.

Pattern:  An amalgam of the diagrams from Costume Close-Up and Fitting and Proper

Year:  Most of the 18th century.

Notions:  None

How historically accurate is it?  The cotton print isn't perfect, I didn't bother with cotton thread, I machine-sewed where I could, and the tape ought to be linen. But the shape and construction is accurate.

Hours to complete:   Maybe 4, including waffling over design and size.

First worn:  Just for pictures.

Total cost:  None; everything came from the stash.

Monday, January 28, 2013

Historical Sew Fortnightly #2: UFO

Un-Finished Object: Ruffled 1780s Handkerchief

DSC06139

I can't help feeling a little bit like I punted for this challenge. My UFO was already so close to being finished, so it took just a little bit of time. But that's part of my "master plan" for getting bunches of stuff done before June.

It started last summer, when I decided to make a 1780s gown out of pink wool. One of the things that stood out to me about 1780s styles was the big, fluffy, often frilled handkerchiefs worn over the gowns, covering the very low necklines.  I didn't actually finish the gown until the Wednesday before Costume College, however, so my plans for a foofy handkerchief weren't complete. Instead, I wore the cut, but completely un-ruffled and un-hemmed, handkerchief.

DSC_0488

The fabric is marvelous stuff, a "barred" cotton organdy I got from the Pure Silks ebay store some years ago. Even after washing it, it remains crisp, as if starched.  I used it for my first (and current only) 18th century cap.

DSC_0482

The shape is a regular right triangle approximately 18" a side, with a 3" slit cut in the hypotenuse for it to fold around the neck more gracefully, as in this example.


The next chapter in the Handkerchief Saga opens with my push to finish lots of things for the Georgian Picnic in November.  It had bottom priority because it was wearable (unlike the bum pad or petticoats), and I really wanted to trim the dress. I ended up with barely enough time to attach the ruffle.  My specific inspiration for the ruffle was this handkerchief ("fichu") from the Metropolitan Museum of Art:


I started by working the ruffle itself, because I knew that would take the longest. I think I cut it twice as long as the two sides of the handkerchief, and 1.25" wide finished. I love the organdy so much! Although loosely woven, it's crisp enough to make rolled hemming very easy. I made extra-small hems on the ruffles, mostly just to see if I could. The big squares in the organdy are about 1/4", so the hem is a little more than 1/16".

DSC06143

The edges of the handkerchief also had to be hemmed first. Then the ruffle was drawn up with whipped gathers and sewn to the finished edge.

DSC06142

I still barely finished before the picnic.  The evening before, I sang in a concert at my church. And I was backstage stitching for dear life the whole time I wasn't performing!  I even had expert help from friend and fellow singer Kathy, who finished hemming the outside edges of the handkerchief while I was sewing the gathers.

DSC05815
Working separately: Handkerchief on left, ruffle on right.

DSC05818
Working together: Attaching the ruffle, and nearly done hemming the handkerchief.


The raw inside edges of the handkerchief were completely hidden when I wore it. I was surprised by how differently it lay with the ruffle on it, but I liked the look.

DSC05851


DSC05849

But still, those raw edges bothered me. Instead of putting it away, the handkerchief has been haunting my cutting table for the months since the picnic. So the UFO challenge was perfect for getting it done.

DSC05826

Just the Facts, Ma'am:

The Challenge:  HSF #2, UFO

Fabric:  White cotton woven 1/4" windowpane organdy

Pattern:  Roughly from the pin above, from 18th Century Embroidery Techniques

Year:  1780s into 1790s

Notions:  None

How historically accurate is it?  It would be more commonly made of linen instead of cotton. Other than that, and the content of the thread (lightweight Coats & Clark), it's as accurate as I know how.

Hours to complete:  To complete the UFO, 2 hours at most.  Before then, maybe 8.

First worn:  Unfinished 1: August 2012, Costume College. Unfinished 2: November 2012, DFWCG Georgian Picnic. Completed: Not yet!

Total cost:  Pennies for the little bit of thread. Maybe $2 for the fabric, originally.

DSC05827

18th Century Underpinnings

I want to show you some of the undies I made last year, in preparation for the DFWCG Georgian Picnic. I'd made a pink wool gown for Costume College in the summer.  I loved it, but it was barely finished in time.  I wanted to wear it to the picnic, but with lots more trim and accessories - and underthings.

Bum Pad

Funny name! But it's period. The 1770s and 1780s saw the last big hurrah of the wide side hoops, and the appearance of the big rear.  My pink wool gown is more 1780s than 1770s, so I desperately needed some kind of skirt support.  I tried to make one in the summer before Costume College, but it was rather terrible.  It didn't have enough waist shaping, so it was like trying to wrap a flat, rectangular pillow around very curved hips.  Not flattering, even by 1780s standards. I ended up borrowing one from Lauren for the weekend, but I needed my own.

I studied the posts by Adventures of a Costumer and Rococo Atelier extensively, and took apart my first attempt. Second try: success!

DSC05748


DSC05745


The waist shape is very curved, and fits nearly around my waist.  The waist binding is blue twill tape I got from the trim lady at Costume College in 2011.  It's really too wide at 1.5", but it's pretty. :) The ties are ordinary 1/2" white tape.

DSC05751


I pieced the original shapes I'd cut. The piecing seams are visible at the side front, where I added more to wrap around my waist.

DSC05768


The fabric is a cotton cambric I bought from Pure Silks' ebay store.  It's semi-sheer and incredibly stiff, even after being washed and dried. Like Rococo Atelier, I added a ruffle to soften the outline. The ruffle is a selvedge edge of the cambric and stands up on its own.

DSC05769


When I first finished the pad, I squirted it with water to get the blue marker out and set it on the windowsill to dry in the wind.

DSC05752

After 30 seconds I reconsidered, and fastened one tie to my sewing machine chair. A wise precaution, because when I thought to look 30 minutes later...

DSC05753

Sometimes I'm smart! (But who knows what the neighbors thought.)


Matelasse Petticoat

Another common 18th century skirt support is the quilted petticoat.  I haven't been much interested in quilted petticoats. Texas is super warm most of the time, and quilting a petticoat is very time-intensive.  But an alternative is matelasse, a fabric developed in the period to mimic the look of expensive quilted fabric. At the time it was called Marseilles or marcella cloth; see more information here at The Lady's Repository Museum.

Many historical textiles are no longer made. Matelasse is an exception, though not as garment fabric. It is used primarily for bedding. It is usually cotton or cotton blend, and in limited colors.  I do not know how closely modern matelasse corresponds to marcella cloth, but for many costumers it is a reasonable substitute for hand-quilted material.

On a whim, coinciding with a big sale at Joann's, I bought enough off-white matelasse to make a short-ish petticoat.

I used the same blue twill tape for the bands and ties. The extra width did made the waist binding easier; matelasse is heavy.

DSC05763

I used the Threaded Bliss/Fashionable Frolick petticoat tutorial to guide my construction. Because the matelasse is so heavy, I made the sides barely overlap. I also made the center front box pleat very wide, to keep the front as flat as possible. To get the right 1780s look, the front should be flat with most fullness in the back.


DSC05764

The design on the off-white matelasse is particularly elegant. I really like it.

DSC05766

The one tweak I need to do is shorten the center back. I deliberately made it longer than the front, to allow for the bum pad, but I added too much. A significant dip is clearly visible when I wear it.


Sheer Petticoat

I wore a sheer petticoat over my green one under the pink wool at Costume College.  It was a work in process: totally unhemmed and lacking a flounce.The material is similar to period "muslin," probably called voile today.  It is cotton, sheer (you can read text through it easily), and very, very limp.  I suspect that period muslins weren't quite this limp.  I was in a hurry, so instead of hemming it I just pinked the edge.

I learned that weekend that (1) it was too long, and (2) a pinked hem wasn't sufficient for the muslin.  There was a lot of raveling. A stiffer fabric like organdy or cambric wouldn't have raveled.

When I got back to the petticoat, first I re-cut the hem, then did a narrow rolled hem.  It took a while, and was fairly tedious, but it looks nice now. And I won't be getting threads caught in my shoe buckles. ;)  Then I finished the flounce.  The flounce is about 12" deep, with a pinked top edge and a dagged (pointed) hem also cut with pinking shears. The picture is out of focus - the pinking is frayed, but not that badly. The line is the rolled hem of the petticoat underneath.

DSC05762

The flounce is not very full, so I pleated it before setting it on the skirt. My friend Jordi sent me a sewing bird last fall. This was the first project I used it on. It worked wonderfully!

DSC05754

The completed petticoat. I did not use blue ties on this one. ;)

DSC05760


I also did some work on the pink dress itself. That's for another post!


Wednesday, January 16, 2013

Historical Sew Fortnightly #1: Bi/Tri/Quadri/Quin/Sex/Septi/Octo/Nona/Centennial

Otherwise known as: What would reasonably still be in use by year XX13?

My costuming plans for this year include projects from the 1790s into the 1810s.  The first step of any gown is the foundation.  I have 1780s stays, but the 1790s gown is a transitional style and needed a different silhouette.  My 1800s stays give too low a waistline, so I also wanted to replace them.

I'm fascinated by the transitional styles between the upright, long-waisted, big-skirted 18th century and the graceful, high-waisted, flowing skirts of the early 19th.  Transitional stays are just as interesting.  I decided to reproduce these ca. 1790 stays from the Victoria & Albert Musuem.


There is no pattern for these stays. I started with the diagram given for late 1790s stays on page 44 of Corsets and Crinolines.  These stays did not have the bust cups of the V&A stays, and they were longer, but the pattern pieces and boning lines were similar.

I enlarged the pattern using my printer/scanner and Adobe Acrobat:

1. Scan the pattern at medium resolution.
2. In Acrobat, open the Print window. Select Poster print and enlarge it. Easy!

In this case, I printed at both 350% and 400%. 350% was perfect for the scale, but I was afraid it would be too small so I started my mockup with the 400% pieces.  It turns out that 350% would have fit me better, but who cares? :)

The only other major change to the pattern, besides adding the bust cups, was to shorten the whole thing 1" below the bust.  The 1790s transitional style I'm focusing on all had slightly raised waists, so I had no interest in making these fit my waist.


I made 2.5 mockups. The first was in muslin with no boning, to get a general idea of the fit and where to fit the bust cups.  The second muslin was in cheap cotton duck, with steel boning duck-taped to the inside.  The duck tape worked perfectly! It tears down the middle into perfect casing-sized pieces.  My mockup and the tape are both white, but hopefully it's clear in this picture.


DSC06037


Eventually I shortened the straps and tightened the seams enough to get a really good look.  For a final check, I put on one of my Regency gowns. The red dot marks where the new waistline is, a good 1.5" higher than before. Success!


DSC06039


The stays are three layers: cotton drill, cotton sateen, and lightweight mauve wool.  I debated using linen canvas, but the V&A stays are cotton and I saved the linen for another project.

I used a mix of 18th and 19th century techniques in construction. The V&A stays do not have a binding, so I ended up sewing all layers of each piece together at the side seams, with the top and bottom edges in to be hemmed later. The boning channels were machined.


DSC06051


Then I sewed the pieces to each other: wrong sides together, with a running stitch through all folded edges.  It's a very strong, and rather ornamental.


DSC06072


The bust cups are only wool and sateen, gathered up on cording.  I liked the multiple rows of cording because they give more support, similar to gussets in later stays.


DSC06049


The rest of the work was done by hand: setting in the bust cups, hemming all around, and 32 eyelets.  I also sewed down a narrow 1/8" tape over the seams.  I almost felt bad to cover them up, but I love the emphasis given by the white lines.

DSC06080


I waited as late as I could in the construction before inserting the reed.  It's so much easier to work with stays when they're not all stiff and awkward!

There are some tweaks I still want to make, such as cutting the tabs further up, adding cording above them, and topstitching all around the edges, but I'm very pleased with my new stays!


DSC06074


Just the Facts, Ma'am  (Does anyone else get that reference?)


The Challenge:  HSF #1, Bi/Tri/Quadri/Quin/Sex/Septi/Octo/Nona/Centennial

Fabric:  white cotton drill, white cotton sateen, mauve wool suiting

Pattern:  Adapted from Corsets and Crinolines, page 44.

Year:  The V&A stays are c. 1790, but I think they're mid 1790s.

Notions:  reed for boning; Sugar 'n' Cream cotton yarn for cording

How historically accurate is it?  The shape is as accurate as I can make it. Construction is accurate, except for the use of the machine for basting, side seams, and boning channels.  The wool suiting is a twill weave that may not be accurate.  I think I used polyester thread, because I'm annoyed with my cotton thread curling so much, and linen would be more accurate anyway.

Hours to complete:  Including patterning and mockup time, roughly 40 hours.

First worn:  Only once with all the lacing, just to make sure they work.

Total cost:  I didn't buy anything for this!  Maybe $10 of fabric, and the reed was given to me.


My brother Trevor gets credit for an assist.  I supplied him with reed, scissors, ruler, nail file, trash can, and a list of lengths.  During the football games last Saturday, he measured, cut, and sanded 34 pieces of reed boning for me. (That includes two that I broke in my final try-on.)  Thank you so much, Trevor!


DSC06077
The list of cut lengths I gave him is barely visible on the far right.


The Historical Sew Fortnightly has already proved its worth for me.  If it weren't for the challenge, I would not have decided on a design as quickly as I did.  I'd still be dragging my way through the construction.  But 10 days, I have one of my biggest 2013 projects out of the way.  Now I can make pretty dresses to go over the stays!

Monday, January 7, 2013

Throwing My Bonnet into the Ring: The Historical Sew Fortnightly Challenge


I’ve never participated in a challenge or sew-along before.  Some are too time-intensive (Sew Weekly), some are very timing-specific (most sew-alongs), and just about all of them mean spending time creating something I don’t really need, in place of other things I really do need.  In other words, it’s adding an obligation.

When I saw mention of the Dreamstress’s 2013 challenge over the Christmas holidays, I was intrigued; and then the description lit my fire.  This challenge will not only be fun, it will be helpful, encouraging, and motivating.

I have a very large sewing list I want/need to get through before the middle of June: everything I need for both the 150th Gettysburg and for Costume College.  Even with nearly six months to work, I was nearly flailing, trying to decide where to start sewing, buying, and researching. (Not in that order.) The HSF is genius!  The challenges are specific, but open to wide interpretation.  I think I can wangle nearly something from my list to fit every challenge!  So I have:

·         Schedule.  I’ve got to have a plan for getting all my projects done. The HSF gives me a rough outline I can work with, and through, without being entirely self-determined.
·         Motivation. I’m one of those people who work well from lists (I do write things down solely so I can cross them out!) for the motivation I get from accomplishment.
·         Deadlines.  I don’t like stress, but reasonable deadlines help me keep focused and working.
·         Encouragement and interest from sewing along with others, and seeing how everyone else interprets the challenges

The challenge projects are also not the only things I will be sewing. They just add a more fun wrinkle to it!  My plans for the later challenges are also rather fluid.  They’ll change up as I accomplish more and get a clearer vision for the next items.

My one resolve is not to make something solely to fit a challenge. I simply have too many necessary things to make to afford extra projects.

Right now, here are my plans:
Refashion 1860s corset. I will do my project post for this shortly. All I did was insert bust gores and raise the front upper edge. It was tedious, and definitely a franken-corset, but it fits much better now. I’ve already made new base patterns for all my immediate 1860s needs, too.
Late 1790s-1810s short stays.  My costuming plans for this year included both mid/late 1790s transitional stays and new 1800s short stays. I woke up Friday morning realizing there was no reason one set of stays couldn’t be perfectly accurate for both!  Based on the Dreamstress’s extended description (“…what you really want to do is make something that would be worn in 1813 (or 913, or 1613) without looking too outdated”), I think these stays fit the bill.


Mine will be covered with mauve tropical weight wool, stitched with white. Pretty!
  • #2: UFO - due Jan 28.  Let’s get something off our UFO pile! Use this opportunity to finish off something that’s never quite gotten done, or stalled halfway through.
I’m going to finally finish hemming the cross-barred organdy 1780s handkerchief I first wore at Costume College last year. I hemmed the outer edges and added a ruffle for the Georgian picnic in November, but the neck edge is still raw. I’ve decided this doesn’t violate my one resolution
  • #3: Under it all – due Feb 11.  Every great historical outfit starts with the right undergarments, and, just in time for Valentines day, here’s you’re excuse to make them. Chemises, corsets, corded petticoats, drawers, garters, stockings…if it goes under your garments, it qualifies.
Pockets!  It’s a long sad story, but sum up: I have only had one 18th century pocket, it’s rather small, and the bottom seam has ripped almost completely out. I’m going to make two big pockets that I can use for everything pre-1800.
  • #4: Embellish –  due Feb 25.  Decorations make the historical garment glorious. Whether you use embroidery, trim, pleating, lace, buttons, bows, applique, quilting, jewels, fringe, or any other form of embellishment, this challenge is all about decorative detail.
Trim 1810s dress.  This dress isn’t strictly part of the challenge, but it’s something that needs finished before the end of March. My design isn’t final yet, but There Will Be Trim.
  • #5: Peasants & Pioneers – due March 11. As wonderful as making pretty, pretty princess dresses is, the vast majority of people have always been poor commoners, whether they were peasants working the land, servants in big houses, or (later), pioneers carving their own space in new lands. This fortnight let’s make something that celebrates the common man.
???  This is the tricky one, since nothing of what I’m planning is for a truly poor or frontier impression.  I’m leaning toward some workaday underpinnings, which, if done without expensive lace, could be worn by almost anyone: 1700s or 1800s shift (I hate my current one, the neckline is HUGE), Regency petticoat with straps, 1860s drawers, 1860s chemises…
  • #6: Stripes - due March 25. The stripe is one of the oldest patterns, appearing in the earliest textile fragments and visual records of garments, and its never gone out of style since. Celebrate stripes with a striped garment. Will you go for grand baroque stripes, pastel rococo stripes, severe neoclassical stripes, elaborately pleated and bustled Victorian stripes, or something else entirely?
1800s/1810s detachable white sleeves. ???  I’m not sure about this yet, but that’s what I’m leaning toward. I’ve got some semisheer white cotton with narrow woven stripes that will work for various white accessories.
  • #7: Accessorize – due April 9.  Accessories add polish to your outfits, helping to create the perfect historical look. This week is all about bringing an outfit together. Trim a bonnet, paint a fan, crochet an evening bag, sew a shawl, or dye and decorate a pair of shoes to create the perfect period accessory for yourself.
1810s hat. ???  I haven’t settled on this yet, but the hat will be needed for sure. I also need a reticule, but my old one isn’t as terrible a clash with this gown as it has been with others. We’ll see.

Plenty of my needs are left off this. A sheer dress for Gettysburg, the Curtain-Along dress, anything to do with the Majestic Mantua…  But note that with the exception of #2 and #4, all of my entries are fairly small items.  I will be able to work on other projects, including research, finalizing design, and drafting and muslin testing (YICK), concurrently with finishing the challenges.

I’m super excited! And it feels good to be moving forward.

Friday, September 21, 2012

Pondering Construction on the Met Gown

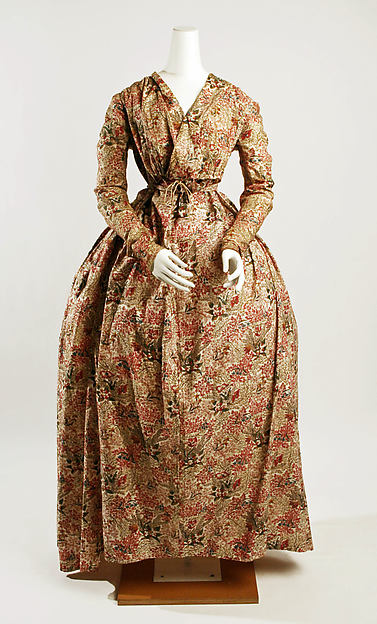
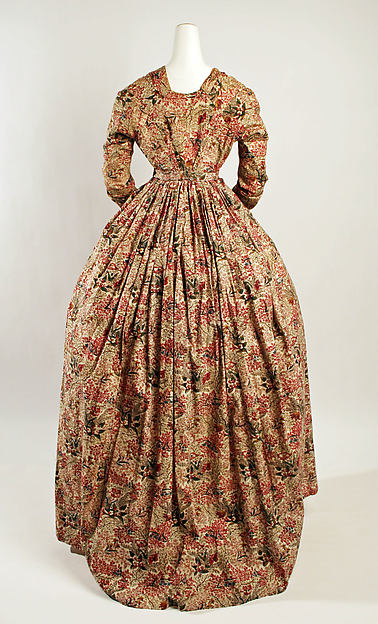
I mentioned last week that I'm participating in the Curtain-Along.  I'm going to use the red curtains, and try to reproduce this dress, from the Met.

The Metropolitan Museum of Art, Accession Number 2004.441 (The pictures of it below are hosted on my Flickr.)


It looks like a plain round gown with a wrap front.  I thought it was at the natural waist, but now I'm thinking it is high-waisted. But on closer inspection:

(1) The wrap fronts are "floating" away from the waist of the gown.


(2) There is clearly a drawstring tie, but it is centered on the gown, in the middle of the top wrap panel.
(3) There is dress material behind the bodice wrap panels.


I've been puzzling about this for some time.  It's mounted rather poorly (just look at the skirt!), which does not help.  It may have been worn by a much larger woman than the mannequin as well. I'm not certain it wasn't rearranged between photographs. And although the zoom function is powerful, the photos do not have high enough resolution.  Possible solution:

1. The front bodice is a mock wrap. The panels are stacked onto each other and a single drawstring channel is sewn. Then it can be drawn up evenly from the middle. It is not attached to the skirt at all.

2.  The skirt is an apron front with dress fabric at least partly above the waist, so as to keep lining material from showing in case of gapping. Possibly only slightly gathered for the original wearer, but gathered more tightly for the mannequin.

My theory:
-->  Regular 18th century apron front gowns had the front skirt just pleated to a band or tape that tied around the body under the gown. The bodice dipped below the waist and there was little opportunity for gapping.  However, if this is a brand-new-style high-waisted gown, combined with the newer straight-waist bodice, there is very great risk of gapping (particularly on a larger woman), and a new solution comes up: Add extra material to the skirt front above the waist.

Even with this theory, I'm still not sure what the underbodice will look like.  I need to look at other very early high-waist gowns and try to find some construction details. I'm familiar with Regency "apron front" gowns, but this is different.


I did find a couple of things on Pinterest. Nothing 100% spot-on for the look, but things that look similar in construction, and I can see how that dress could have been intended to look.

I like this one. Long sleeves, still natural waist, crossover. Plus a crazy ruffed undershirt thing and turban!


 (Higher resolution here.)

There's a couple of KCI ones that I'd like to look at in more detail.


This is another option: instead of the fronts overlapping, just tying together at the waist.


 I'll leave you with one last picture, of the back. Three seams on each side! SO fun. :D

Wednesday, September 12, 2012

Join the Curtain-Along!

The blog got away from me! I've had a bunch of Real Life affairs come up.  Being a new and inexperienced "official" blogger, I haven't had a buffer of posts to go up to cover my absence.  But the plan is to get back on track with my Costume College re-cap in a few days, then to mix up more analysis of my Costume College outfits themselves with other topics.

In the meantime, I wanted to spread the word to check out Jen of Festive Attyre's new Curtain-Along. 


Basically, the home improvement store Lowe's is currently selling cotton curtains in an appropriate 18th-century print.  The price works out to about $9/yd, which is standard for a good reproduction quilting cotton, and way cheaper than the regular price at Joann's for home dec fabric. There are other sources and other colors, too, in her blog post.

The Curtain-Along isn't a sew-along as such, but it is a voluntary giant group-inspiration project. It's going to be fascinating to see all the different garments that can be made from this print!

Check out Jen's Pinterest board for direct links to the curtains and current projects using the fabric, and her indienne print board for inspiration.

I already have an indienne print cotton gown in a blue and green on white pattern.  I'm thinking that RED this time would be a lot of fun! And this 1790s gown from the Met is really starting to intrigue me...

The Metropolitan Museum of Art, Accession Number 2004.441

The Metropolitan Museum of Art, Accession Number 2004.441