 |
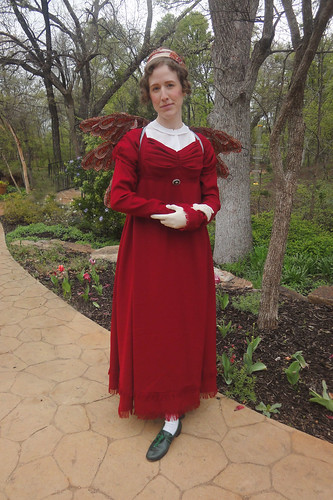
| (photo by festive attyre) |
It's a bit difficult to post about the dress. I already focused on the fringe for HSF #4, and my first post back in January had most of the design inspiration. The finished product is pretty much exactly what I had in mind. Rare for a perfectionist!
The skirt is mostly Skirt D, from Jean Hunnisett's Period Costume for Stage and Screen. (I use Hunnisett quite a bit for Regency. The book is not intended for total accuracy, but the Regency diagrams are taken from originals. And they cover the progression of Regency fashion, particularly covering the gaps left by Patterns of Fashion.) Skirt D was originally from a very narrow-width fabric, so it has one straight width in front, two right-angled gores on each side, and another straight width in the back. I cut my gores close to the original diagram proportions, while the back was a single full width. In hindsight, this was probably a little too much material for the period.
 |
| Cutting the gores by drawing with chalk directly on the fabric. |
 |
| A tip from my mother: Use sticky dots to label pattern pieces and even right side/wrong side. |
I did not do a straight rectangle for the front of the skirt. I wanted plenty of fullness/swing at the hem, and a perfectly straight-fronted skirt is not a good idea on my wide hips. I am slightly paranoid that one of my gowns will pull across the hip when I stand straight! I made two changes:
(1) I cut a narrow trapezoid instead of a rectangle, so there was more fullness at the hem.
(2) I cut the waist concave, instead of straight; this causes the material to drape slightly in the center.
I have no idea how essential these changes were (and they are period variations, by the way), but I have little to complain about with the shape I got. There certainly was no pulling at the hip.
 |
| Too much of an overlap/pleat with the apron front? (photo by festive attyre) |
Putting the skirt on the bodice was an unexpected difficulty. I didn't want to do knife pleats, because the Dreamstress had just done that for her wool Regency gown, and I wanna be special. ;) So I tried gathering it, only to discover that even with big hand gathering stitches, I couldn't gather the material tightly enough.
Then I tried various combinations of wide box pleats: centered, symmetric, stacked, box and knife combinations... The joker in the deck, besides the springiness of the fabric, was the upward curve of the waistline. When I set these box pleats in straight and then hung it, the sides of the pleats pushed upward.
 |
| Pooch! |
I think I basted in and tried on five variations, all told. This experience is the one that will make me finally get a dress form!
 |
| I think there are triple stacked pleats in the center, and double on the sides. (photo by festive attyre) |
The bodice itself is closely adapted from the Patterns of Fashion bib front gown (c. 1798-1805). It was not too hard to fit; the main issue was adding width in the center back and under the arms to keep the armholes placed correctly. The sleeves were a whole 'nother issue, however.
See, I was already on shaky ground trying to get a c. 1810-1815 shaped bodice and sleeves out of a c. 1798-1805 pattern. I thought that the pattern was dated only due to the skirt's train and the loose, elbow-length sleeves; since I was doing a different skirt and changing the sleeves, I thought I would be good. I really wanted to keep the pattern's small back, bib front, and cut-back armhole shape. Guess what: Sabine, on her amazing 1815 gown, demonstrated that 1810s armholes should be on the edge of the shoulder, not over the back. Whoops!
 |
| My second muslin, testing the back waist curve and initial versions of the lining sleeve and puff sleeve. |
So I guess I'm shading this one back to ca. 1810 instead, when the bigger armhole is more likely. It's a bummer from one perspective, but still, I'm so glad to know. One of the things I love about making historical clothes is the learning. There's always more to discover!
Anyway, I wanted the short puff sleeve very short but full, with precise and interesting pleats, and an upward curve at the edge. I went through probably four muslins, before I got a decent shape. I ended up adding fullness to be controlled by pleats into the back of the armhole, a downward "swoop" at the edge that was gathered up with pleats in the center of the sleeve, and the edge itself controlled by more pleats. The wool was perfect material for this style of sleeve, because it's wonderfully drapey, but still has plenty of body to hold out the pleats and not go limp.
 |
| Final pattern shape for the puff sleeve. |
 |
| Pinning in the center pleats to take up the fullness. |
 |
| Center pleats and cuff pleats basted. |
 |
| Sleeve head pleats basted. |
 |
| Finished! |
 |
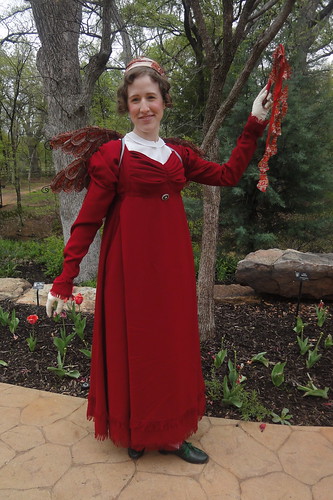
| (photo by festive attyre) |
They do look a little extra-puffy from the back. Oh, well! I still like them.
I've also already explained the fringe addition to the edge. It's subtle, but I like the extra texture it gives.
 |
| Back view, finished, with fringe and band. |
I did two other sleeves as well. As with the PoF gown, I did a short linen lining sleeve with no fullness, and a long straight-ish sleeve that would button onto it. The long sleeve is adapted from Hunnisett, but it's super simple: a long narrow trapezoid, with a little flare after the wrist so it can fall over the hand. Wrist bands are set into the sleeve seams, and wrap around and button to form a cuff.
 |
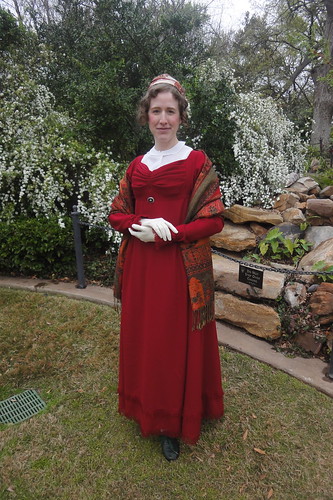
| (photo by festive attyre) |
The sleeves worked fairly well. I wish the wrists were a little smaller; I may go back and narrow them. I will also raise up the attachment buttons. I kept revising the puff sleeve to be so short that I was afraid the long sleeves would pull up. Instead, I had some extra length. The white under sleeve did peek out under the puff sleeve at times, so I have both reason and room to move the attachment buttons up.
The bib front I based on a blue figured silk example. I made a first mockup with pins, trying for the closest proportions of the pleats. I made the pleats much deeper than visible; each one is about 1.5". The center shaping is just a dart. The pleats are not sewn down, as far as I can tell; they're secured at the edges and the center.

I made a better mockup, with my best guess for width, and pinned it into the gown. I discovered that the original piece had to be an upside-down trapezoid to give it enough fullness to dart out at the edge. Also, I found that because of the "shelf" given by my stays, the center front dart would be strongly curved or bent instead of straight. But the pleat proportions were good.

I cut a piece out of the fabric, on the bias, 3-4" larger than I thought it needed to be. I did the pleating on the center front, then kept trying it with muslin side bands on to determine exactly how wide to make the finished version. As with the sleeves, the wool was a great material for this style. It would not have the same effect in cotton.
 ]
]
 |
| (photo by festive attyre) |
Now that it's done, I can see from pictures that the bottom pleat should have been even deeper than 1.5". It's pulling out as the bib is folded over the shelf of the bust. There's no fixing it at this point, although I might try to pin the bib front a little lower to relieve the tension.
At the last minute, I added a tiny bum pad. It's just a piece of muslin wrapped around a little of the thread left from making the fringe, tacked together and then to the dress. I'm not sure how much of a difference it made. Should it be stuffed a little more?

And finally, I added an interior waist tie. It's tacked at back, sides, and side fronts with a little extra ease. Thus when I tie it, it puts a smidge of extra tension on the bodice itself, making sure it's totally smooth around the stays.

This is such a GORGEOUS creation! Thank you for sharing the in-depth notes on the construction. I'm getting ready to do a Regency gown (not my area of expertise) and I'm pretty nervous. Your post here is a big help. :-)
ReplyDeleteI'm so glad! I learned SO MUCH from reading others' blogs, I really just hope I can pass along the knowledge and experience. Speaking of - keep in mind that this is a pretty complex gown. Regency can be much simpler. ;)
DeleteSo utterly beautiful! Especially love the sleeves!
ReplyDeleteThank you!
DeleteI love the pleated treatment you gave the bodice bib! Such a lovely gown.
ReplyDeleteThank you so much! I browsed Pinterest for quite a while before I found an image I really liked. I knew I wanted something that capitalized on the nature of the wool, but I didn't know what!
DeleteYour dress is beautiful! I love the bright red colour, the wool fabric (the wool fringe on the skirt!!!), the bodice construction and the overall attention to detail. The decade of the 1810s is just so amazing and decorations are so pretty, aren't they? In the early 1800s the skirt train kind of flows (which is very elegant), in the 1810s the skirt just swings (which is such fun!!!).
ReplyDeleteThanks for giving so much information on your construction.
Sabine
Hi, Sabine! I'm honored that you like it so much! I *do* love the 1810s. And that's exactly what I've said about the skirts! 1800s drape and flow, but the 1810s skirts are fun. This one is so much fun to wear, especially with the weight of the fringe on it. And thank you for being so helpful and inspiring with your posts.
DeleteGinger
Thanks for all the detailed photos and notes on this dress!!! Its really incredible, lovely work and you wear it so well :)!!
ReplyDeleteGorgeous, gorgeous work! I think this may be one of my favorite things you've ever made. I love the bodice pleats, the sleeves, the skirt, everything!
ReplyDelete