Showing posts with label 1790s. Show all posts

Monday, April 15, 2013

My Turn - the Highbury Shoes!

I get to promote some American Duchess shoes: the Highbury Regency flat!


These are far and away my favorite American Duchess so far.  That mostly because I'm not heavily into the bulk of 1770s costuming, and so far I haven't really done anything after 1865.

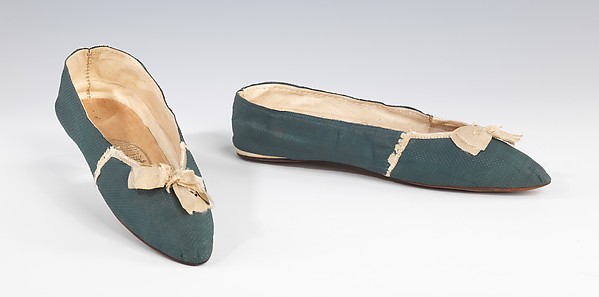
I like the Highbury slippers because they have the pointed toe, fairly high vamp, and low heel that's characteristic of shoes from c. 1795-1810.

source


In addition, they have tiny little loops inside that can be used to lace a ribbon through. You can use all of the loops, as in the model picture, or use fewer loops for a different look.

Costume Parisien, c. 1798


source


Right now, I'm dreaming about a pair dyed a nice, bright yellow.

source

I think I'd also trim them with white ribbon at the seams and around the front of the vamp, and add a strip of white leather to imitate this common look at the heel.

source

I can't wait!

Wednesday, January 16, 2013

Historical Sew Fortnightly #1: Bi/Tri/Quadri/Quin/Sex/Septi/Octo/Nona/Centennial

Otherwise known as: What would reasonably still be in use by year XX13?

My costuming plans for this year include projects from the 1790s into the 1810s.  The first step of any gown is the foundation.  I have 1780s stays, but the 1790s gown is a transitional style and needed a different silhouette.  My 1800s stays give too low a waistline, so I also wanted to replace them.

I'm fascinated by the transitional styles between the upright, long-waisted, big-skirted 18th century and the graceful, high-waisted, flowing skirts of the early 19th.  Transitional stays are just as interesting.  I decided to reproduce these ca. 1790 stays from the Victoria & Albert Musuem.


There is no pattern for these stays. I started with the diagram given for late 1790s stays on page 44 of Corsets and Crinolines.  These stays did not have the bust cups of the V&A stays, and they were longer, but the pattern pieces and boning lines were similar.

I enlarged the pattern using my printer/scanner and Adobe Acrobat:

1. Scan the pattern at medium resolution.
2. In Acrobat, open the Print window. Select Poster print and enlarge it. Easy!

In this case, I printed at both 350% and 400%. 350% was perfect for the scale, but I was afraid it would be too small so I started my mockup with the 400% pieces.  It turns out that 350% would have fit me better, but who cares? :)

The only other major change to the pattern, besides adding the bust cups, was to shorten the whole thing 1" below the bust.  The 1790s transitional style I'm focusing on all had slightly raised waists, so I had no interest in making these fit my waist.


I made 2.5 mockups. The first was in muslin with no boning, to get a general idea of the fit and where to fit the bust cups.  The second muslin was in cheap cotton duck, with steel boning duck-taped to the inside.  The duck tape worked perfectly! It tears down the middle into perfect casing-sized pieces.  My mockup and the tape are both white, but hopefully it's clear in this picture.


DSC06037


Eventually I shortened the straps and tightened the seams enough to get a really good look.  For a final check, I put on one of my Regency gowns. The red dot marks where the new waistline is, a good 1.5" higher than before. Success!


DSC06039


The stays are three layers: cotton drill, cotton sateen, and lightweight mauve wool.  I debated using linen canvas, but the V&A stays are cotton and I saved the linen for another project.

I used a mix of 18th and 19th century techniques in construction. The V&A stays do not have a binding, so I ended up sewing all layers of each piece together at the side seams, with the top and bottom edges in to be hemmed later. The boning channels were machined.


DSC06051


Then I sewed the pieces to each other: wrong sides together, with a running stitch through all folded edges.  It's a very strong, and rather ornamental.


DSC06072


The bust cups are only wool and sateen, gathered up on cording.  I liked the multiple rows of cording because they give more support, similar to gussets in later stays.


DSC06049


The rest of the work was done by hand: setting in the bust cups, hemming all around, and 32 eyelets.  I also sewed down a narrow 1/8" tape over the seams.  I almost felt bad to cover them up, but I love the emphasis given by the white lines.

DSC06080


I waited as late as I could in the construction before inserting the reed.  It's so much easier to work with stays when they're not all stiff and awkward!

There are some tweaks I still want to make, such as cutting the tabs further up, adding cording above them, and topstitching all around the edges, but I'm very pleased with my new stays!


DSC06074


Just the Facts, Ma'am  (Does anyone else get that reference?)


The Challenge:  HSF #1, Bi/Tri/Quadri/Quin/Sex/Septi/Octo/Nona/Centennial

Fabric:  white cotton drill, white cotton sateen, mauve wool suiting

Pattern:  Adapted from Corsets and Crinolines, page 44.

Year:  The V&A stays are c. 1790, but I think they're mid 1790s.

Notions:  reed for boning; Sugar 'n' Cream cotton yarn for cording

How historically accurate is it?  The shape is as accurate as I can make it. Construction is accurate, except for the use of the machine for basting, side seams, and boning channels.  The wool suiting is a twill weave that may not be accurate.  I think I used polyester thread, because I'm annoyed with my cotton thread curling so much, and linen would be more accurate anyway.

Hours to complete:  Including patterning and mockup time, roughly 40 hours.

First worn:  Only once with all the lacing, just to make sure they work.

Total cost:  I didn't buy anything for this!  Maybe $10 of fabric, and the reed was given to me.


My brother Trevor gets credit for an assist.  I supplied him with reed, scissors, ruler, nail file, trash can, and a list of lengths.  During the football games last Saturday, he measured, cut, and sanded 34 pieces of reed boning for me. (That includes two that I broke in my final try-on.)  Thank you so much, Trevor!


DSC06077
The list of cut lengths I gave him is barely visible on the far right.


The Historical Sew Fortnightly has already proved its worth for me.  If it weren't for the challenge, I would not have decided on a design as quickly as I did.  I'd still be dragging my way through the construction.  But 10 days, I have one of my biggest 2013 projects out of the way.  Now I can make pretty dresses to go over the stays!

Friday, September 21, 2012

Pondering Construction on the Met Gown

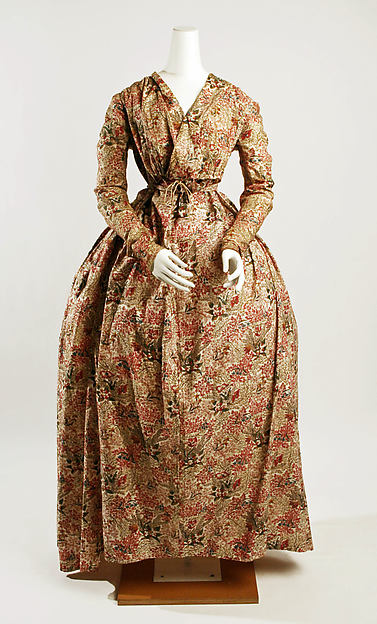
I mentioned last week that I'm participating in the Curtain-Along.  I'm going to use the red curtains, and try to reproduce this dress, from the Met.

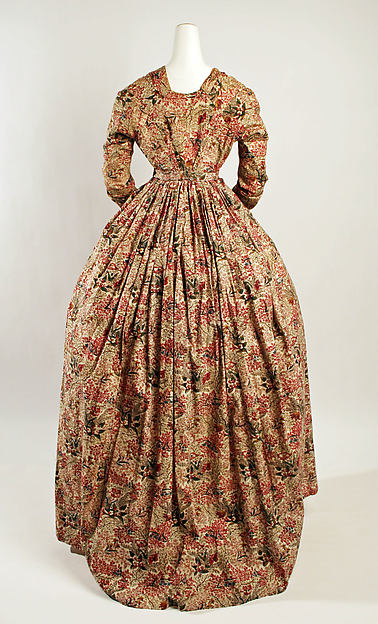
The Metropolitan Museum of Art, Accession Number 2004.441 (The pictures of it below are hosted on my Flickr.)


It looks like a plain round gown with a wrap front.  I thought it was at the natural waist, but now I'm thinking it is high-waisted. But on closer inspection:

(1) The wrap fronts are "floating" away from the waist of the gown.


(2) There is clearly a drawstring tie, but it is centered on the gown, in the middle of the top wrap panel.
(3) There is dress material behind the bodice wrap panels.


I've been puzzling about this for some time.  It's mounted rather poorly (just look at the skirt!), which does not help.  It may have been worn by a much larger woman than the mannequin as well. I'm not certain it wasn't rearranged between photographs. And although the zoom function is powerful, the photos do not have high enough resolution.  Possible solution:

1. The front bodice is a mock wrap. The panels are stacked onto each other and a single drawstring channel is sewn. Then it can be drawn up evenly from the middle. It is not attached to the skirt at all.

2.  The skirt is an apron front with dress fabric at least partly above the waist, so as to keep lining material from showing in case of gapping. Possibly only slightly gathered for the original wearer, but gathered more tightly for the mannequin.

My theory:
-->  Regular 18th century apron front gowns had the front skirt just pleated to a band or tape that tied around the body under the gown. The bodice dipped below the waist and there was little opportunity for gapping.  However, if this is a brand-new-style high-waisted gown, combined with the newer straight-waist bodice, there is very great risk of gapping (particularly on a larger woman), and a new solution comes up: Add extra material to the skirt front above the waist.

Even with this theory, I'm still not sure what the underbodice will look like.  I need to look at other very early high-waist gowns and try to find some construction details. I'm familiar with Regency "apron front" gowns, but this is different.


I did find a couple of things on Pinterest. Nothing 100% spot-on for the look, but things that look similar in construction, and I can see how that dress could have been intended to look.

I like this one. Long sleeves, still natural waist, crossover. Plus a crazy ruffed undershirt thing and turban!


 (Higher resolution here.)

There's a couple of KCI ones that I'd like to look at in more detail.


This is another option: instead of the fronts overlapping, just tying together at the waist.


 I'll leave you with one last picture, of the back. Three seams on each side! SO fun. :D

Wednesday, September 12, 2012

Join the Curtain-Along!

The blog got away from me! I've had a bunch of Real Life affairs come up.  Being a new and inexperienced "official" blogger, I haven't had a buffer of posts to go up to cover my absence.  But the plan is to get back on track with my Costume College re-cap in a few days, then to mix up more analysis of my Costume College outfits themselves with other topics.

In the meantime, I wanted to spread the word to check out Jen of Festive Attyre's new Curtain-Along


Basically, the home improvement store Lowe's is currently selling cotton curtains in an appropriate 18th-century print.  The price works out to about $9/yd, which is standard for a good reproduction quilting cotton, and way cheaper than the regular price at Joann's for home dec fabric. There are other sources and other colors, too, in her blog post.

The Curtain-Along isn't a sew-along as such, but it is a voluntary giant group-inspiration project. It's going to be fascinating to see all the different garments that can be made from this print!

Check out Jen's Pinterest board for direct links to the curtains and current projects using the fabric, and her indienne print board for inspiration.

I already have an indienne print cotton gown in a blue and green on white pattern.  I'm thinking that RED this time would be a lot of fun! And this 1790s gown from the Met is really starting to intrigue me...

The Metropolitan Museum of Art, Accession Number 2004.441

The Metropolitan Museum of Art, Accession Number 2004.441